Introduction
Paid users have access to the latest model to build and update MailChimp’s managed signup forms. This is an amazing option and is recommended for users who are familiar with customized coding. Please contact your programmer or appoint a MailChimp Specialist if you ever need assistance.
Use the Advanced Forms Method
Follow these measures to use the Advanced Forms method:
- Click on the Audience button to move to the Audience Tab.
- Tap on the Manage Audience drop-down list and select Forms of Registration.
- Choose Form Builder.

- Scroll down to the end of the screen and tap on “Advanced Mode” from the Create Form page.

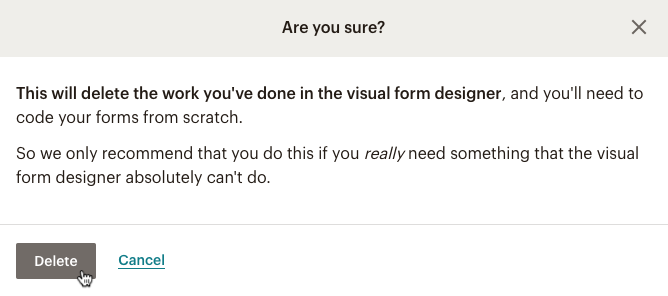
- In the pop-up, press Delete to verify that you would like to set up a new advanced form from blank.
What can I edit?
You can customize a large portion of MailChimp’s audience control forms, addresses, and approval displays. You can edit the following:
- Registration form
- Sign up for a thank you list
- Opt-in email validation
- Confirmation thank you page.
- Final welcome email
- Description of Upgrade Profile
- Upgrade thank you page for profile
- Form for unsubscribing
- Unsubscribe list with acknowledgment
- Email goodbye
- Archive Campaign Page
- Launching Survey website
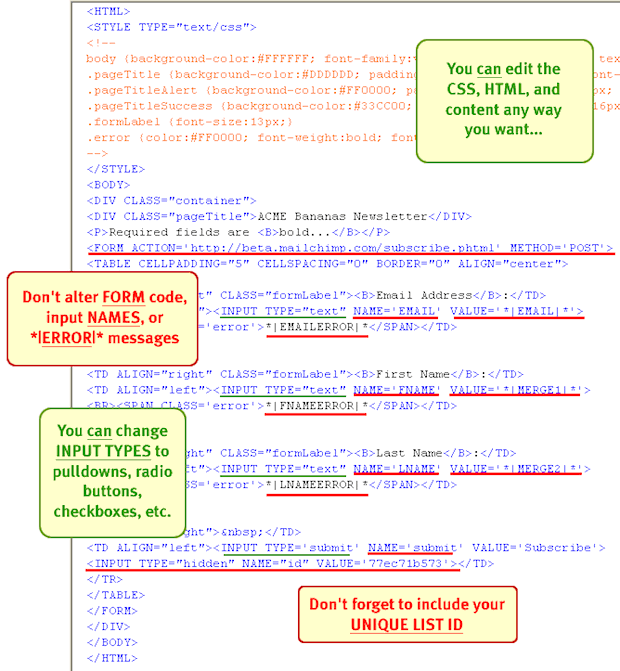
While customizing, keep in your mind that you don’t change the unique Type tags, field names, and merge tags as they’re related to the audience, so you need to remain the same. The accompanying diagram displays the outlined regions of what you should and cannot change.
Customize Thank You Pages
You can also establish Meta redirects to take visitors to your website for personalized thank-you pages. Keep in mind: replace your site with a URL that you intend to redirect. Here’s how you can establish a meta-redirect:
- Click on the Audience button to move to the Audience Tab.
- Click the Control Audience drop-down list and select signup forms.
- Then choose Form Builder.
- Tap the “Thank You” button to sign up or even the “Thank You” page to confirm.
- Copy that Meta redirects, then paste this in the <head> portion of the thanking page file.
- Click on Save Changes.
Customize Signup Form Error Message
If you want to tackle the registration form errors yourself instead of making MailChimp fix them, then use META redirect to return the signup form data to your site. The Link should be a complete guide to the subscriber page of your newsletter. To get the audience variables’ descriptions, move to the audience configuration, and display the fields and corresponding merge tags.
Hidden Fields in Advanced Forms
To add a hidden field to your advanced form code, follow these steps:
- Click on the Audience button to move to the Audience Tab.
- Click on the Control Audience drop-down list and select signup forms.
- Then choose Form Builder.
- Once you have set up an advanced form, the code display should be displayed on the screen. If that is not happening, scroll down, press Advanced Mode, and click on Switch in the Confirmation pop-up.
- Attach an entry to your new field, as you would generally do.
- Modify the value to “hidden.” for the input form variable.
Conclusion
You must have got an idea of how to customize MailChimp embed form. Although you can easily embed forms to MailChimp, you need to make it smooth and work even better. You just need to follow the given steps to make it happen.