
Email marketing has not only reduced the likelihood of small businesses going bust but also plummeted many of them into major successes that they might have not experienced otherwise.
ActiveCampaign was made for the sole purpose of catapulting small businesses into mid-sized ones. They offer up-and-coming businesses the ability to market themselves with the same resources that the big companies use but at a very affordable price.
ActiveCampaign offers a powerful plugin that integrates seamlessly with WordPress. Today I will be walking you through a step-by-step process of getting that done so read on, but first
What Does the ActiveCampaign Plugin Allow you to do in WordPress?
The ActiveCampaign Plugin allows you to;
Add Contact Forms to your Website
It is standard procedure for every website to have a contact form. What makes this plugin a must-install is that with a few clicks of the mouse, you can create beautifully designed forms without the need of coding.
What’s even more fascinating is that you can create your forms right in your WordPress dashboard cutting the need to jump from one platform to another, which saves you time.
The plugin also allows you to;
Connect ActiveCampaign to your WooCommerce Store
When it comes to eCommerce, there is no functionality that beats the ability to collect emails at the checkout page. ActiveCampaign allows you to do just that.
- You can market similar products to these people,
- You can upsell or down sell,
- And you can re-engage customers with abandoned cart emails, causing them to buy.
The plugin also allows you to;
Track your Website Activity
Tracking and upgrading your website based on what is happening on your website is more of a need than a want if you want to create a great user experience (UX) for your site visitors. Heck…Google even ranks websites based on this metric!
The ActiveCampaign WordPress plugin lets you track your site visitors which enables you to;
- Know the number of page visit
- And know the IP address of the visitors without them knowing, though you can create a tracking consent notice to be on the safe side of the law.
If you have upgraded and added the Conversations feature to your package you can live chat with your visitors, thus helping them find what they are looking for, faster.
How to Integrate ActiveCampaign and WordPress Step-by-Step
Integrating ActiveCampaign and WordPress.org is very easy… Just follow the simple steps I have laid down for you and you’ll be good to go.
If you want to integrate ActiveCampaign with your WooCommerce store, jump to step 5 and start from there.
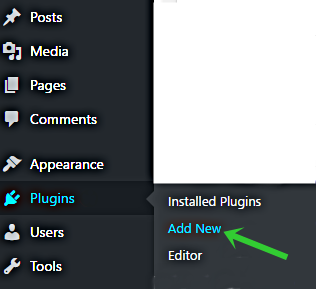
- Log in to WordPress and go to “Plugins > Add New.”
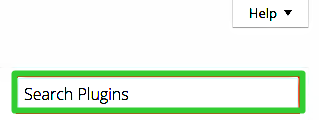
- Go to the search bar and type “ActiveCampaign.”
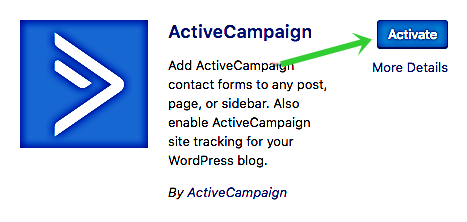
- Install the plugin and activate it.
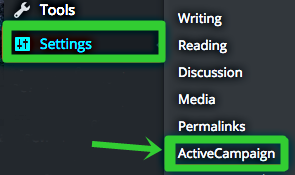
- Go to “Settings > ActiveCampaign.”
- Having clicked on ActiveCampaign, leave the page as is and open a new tab.
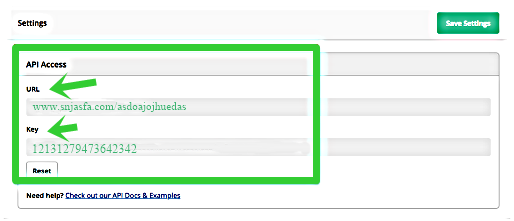
Go to your ActiveCampaign dashboard and get your API Key as well as the API URL.
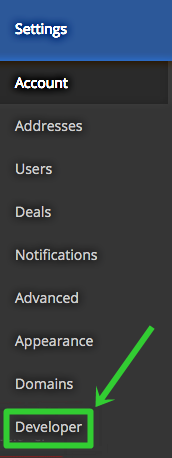
Click on “Settings > Developer > API Access.”
- Copy the “API URL” and “API Key.”
- Go back to where you left off on your WordPress dashboard and paste the two.
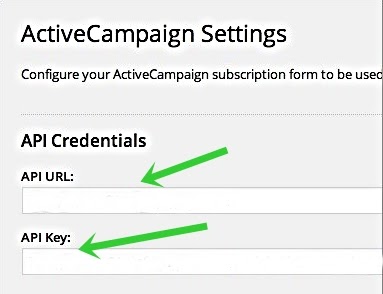
- Click save settings and you are good to go.
How to Integrate ActiveCampaign and WordPress Step-by-Step
If you want to integrate ActiveCampaign with your WooCommerce store, read up because you will need to install a different plugin.
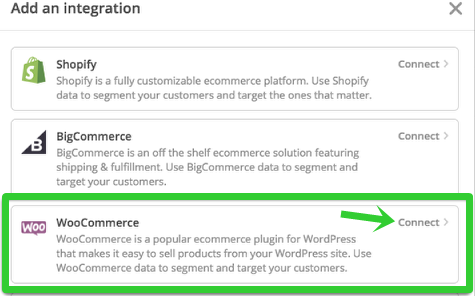
- First go and install the “ActiveCampaign for WooCommerce” plugin following the same steps as the above. Go to your ActiveCampaign dashboard and click on “Settings > Integrations.”

- Click “Add Integration.”

- Look for “WooCommerce” and click “Connect.”
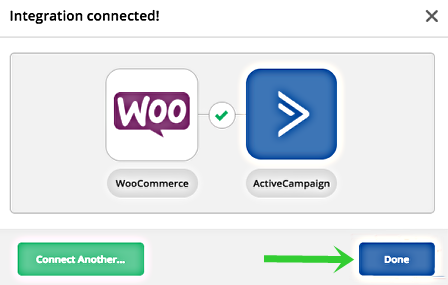
- Enter the URL of your store.

- Click “Done.”
- Still on your ActiveCampaign Dashboard, go to “Settings > Developer > API Access.” Copy the “API URL” and “API Key.”
- Head back to your WordPress dashboard and go to “Settings > ActiveCampaign for WooCommerce > Connection.”
Paste the “API URL” and “API Key” that you copied from the above step.
Click “Update Settings” and you are done with the integration process… Enjoy!
Installing The ActiveCampaign plugin will not only make your marketing campaigns much more effective but will also make them easier to execute.
If you haven’t installed the plugin yet, what are you waiting for?